-
Home
-
Films
- The Constant Gardener
- The Dark Horse
- Divergent Materials >
- The Goonies and Symbolism
- Goonies Characters
- Grow Your Own
- Grow Your Own - Explanations
- Grow Your Own - Shots
- Types of Film Shot
- Invictus
- Mean Creek >
- Prince Caspian
- Rabbit Proof Fence 1
- Rabbit Proof Fence 2
- Snowpiercer >
- The Wind That Shakes The Barley
- To Kill A Mockingbird
- To Kill A Mockingbird 1
- To Kill A Mockingbird 2
-
Shakespeare
-
Year 10
-
Year Ten
>
- Year 10 Poetry
- Bloom's Taxonomy
- Year 10 - Describing Character using SEED
- Year 10 - Crime and Punishment
- Year 10 - Crime Blogs
- Year 10 - Criminals Recap
- Year 10 - Research a Criminal
- Year 10 - Rose Twells Questions
- Year 10 - Choice of Assessments
- Year 10 - Proof Reading
- Year 10 - Writing About Theme
- Year 10 - Portfolio of Writing
- Year 10 - Hero Writing Options
- Year 10 - Group Work
- Year 10 - Heroes and Villains Unit
- Year 10 - Describe a Villain
- Year 10 Film Choices
- Year 10 - What Makes Someone A Hero?
- Year 10 - What is an anti-hero?
- Year 10 - Group Work Discussion
- Year 10 - Famous Literature Villains
- Year 10 - Creating Interesting Writing
- Year 10 - Portfolio 2
- Year 10 - Villainous Vocabulary
- Year 10 - Writing Styles
- Year 10 - Essay Writing
- Year 10 - Write That Film Essay
- Year 10 - paraphrasing
- Year 10 - Cults
- Year 10 - Narrative Writing
- Year 10 - Ideas for Opinion Writing
- Year 10
-
Year Ten
>
- Year 9
- symbols and their deeper meaning
- Short Stories
- Papamoa
- Creative Writing
- I Know Why
- year 11
- If - Rudyard Kipling
- Rain - Hone Tuwhare
- How to Weebly
How To Make A Drama Mask Using Plaster of Paris . . .
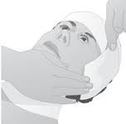
STEP 1: Apply vaseline to hairline and eyebrows. This is important to make sure the mask does not stick to your hair.
|
STEP 2: Apply thin strips of plaster of paris around the forehead and sides of the face.
|
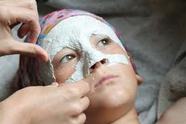
STEP 3: Carefully place the strips down and across the bridge of the nose. It is important that the model does not move their face or talk during this stage of mask making.
|
STEP 4: Cover the whole face, leaving the mouth, nostrils and eyes free of the plaster.
|
Ensure that you DO NOT cover the mouth, as this will mean you will not be able to speak when wearing your mask.
|
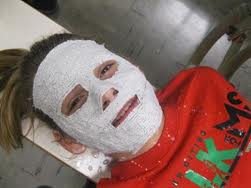
STEP 5: Smooth out the bumps and little holes, then wait until the plaster dries. Don't forget to put a strip between the nostrils.
|
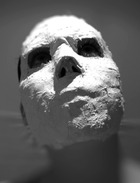
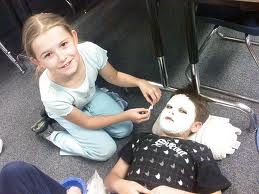
STEP 6: Once the mask is dry, you can carefully remove it from the face, taking care not to break it.
|
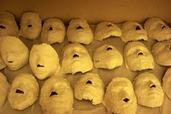
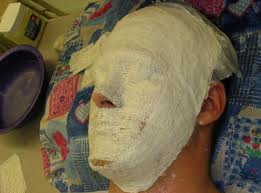
STEP 7: Leave the masks in a safe place to dry overnight.
|
STEP 8: Add any additions and tidy up the edges around the edges of the face, mouth and eyes.
|
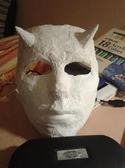
STEP 9: Add any further additions to create a mask character that you can use in a performance. Add elastic and act away! :)
|